Have you ever struggled to remember the context behind a particular design iteration? In the fast-paced world of UX design, decisions are made quickly and iterated even faster. But, as the designs evolve, it’s easy to lose track of the rationale behind the choices we make.
This lack of documentation often leads to confusion, misalignment, challenges in onboarding new team members, and other unwanted consequences. That’s why documenting design iterations isn’t just good practice, it’s essential. By keeping records of the changes and their context, you:
- ensure that everyone on the team stays aligned, and
- preserve valuable insights for future reference
Why document them
Documenting design decisions is crucial for several reasons:
- Team alignment: It ensures the team is cohesive in understanding the rationale behind design choices. Documenting design iterations helps maintain clarity during Agile ceremonies, supports collaboration between designers and developers, and ensures everyone is working toward the same goals with a shared understanding of the design process.
- Stakeholder engagement: It fosters transparency and trust and shows that decisions are deliberate and well-founded. This makes it easier to get buy-in from stakeholders.
- Onboarding: New team members can quickly get up to speed by reviewing documented decisions, making the onboarding process smoother and more efficient.
- Knowledge preservation: Over time, team members may forget why certain decisions were made. Documentation preserves this context, which is invaluable when revisiting the design in the future.
- Preparation for CDDO service assessments: Detailed documentation demonstrates that the team has followed a user-centred, iterative design process. This is essential when preparing for assessments.
In a previous project during a CDDO service mock assessment, thorough documentation was crucial for the designer who had to present. Especially since they weren’t involved in the design process.
Explaining design decisions and iterations can be challenging without direct experience. Detailed notes and feedback summaries helped them piece everything together.
This documentation made it easier to convey the rationale behind each design choice. It also earned positive feedback from assessors, who praised the clear and thoughtful explanation of our user-focused approach.
How to document them
There isn’t a one-size-fits-all approach to documenting design iterations. Each project is unique, and so will be your documentation method. Tailor your approach to suit your team's needs and the specific data you want to capture, ensuring it remains flexible and effective.
Regardless of the format you choose, the minimum information you’ll always want to include is:
- the design iteration made
- the reason for that change
Next, linking what the design iterations are based on - research insight, process or regulation changes, or even technical constraints - is a good practice. This ties the changes to concrete evidence, making the rationale behind each decision clear and unbiased.
It may sound counterintuitive, but taking your time to document each iteration not only saves time in the long run but also fosters a culture of accountability and continuous improvement within the team. Pair that with the right documentation tool, and your team will never lose track of the changes ever again!
Let’s take a closer look at the different tools we can use.
Tools for documentation
When it comes to documenting your design iterations, you have complete flexibility in choosing the tools that best suit your project’s needs. Whether you prefer using spreadsheets, Lucid boards, a plain document, Figma, Jira, or even including it as a page on the code prototype, the key is to select a method that works well for your team and stakeholders. It is a good idea to discuss and agree on the best approach to ensure all relevant information is tracked effectively by everyone.
I’ve experimented with different tools in the different projects I’ve participated in, and here are some of the methods that have worked well.
Figma
When using Figma, I added comments directly next to each section of the page, corresponding to the pain points uncovered during our research. Alternatively, you can highlight specific sections with a box and add explanatory text, which may be more visually engaging.
Here’s a template I created that can be adjusted based on the user research round you completed and the prototype version you are working on:
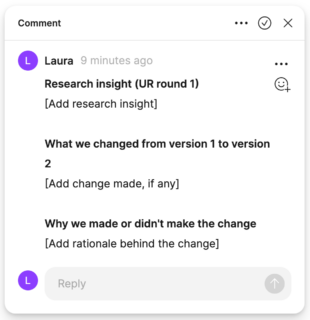
It’s important to remember that not all design changes will be based on direct research evidence, and that’s okay. Sometimes, you may choose to make a change to improve accessibility or decide to hold off on changes until more evidence is gathered. Both approaches are valid and should be documented accordingly.
Documenting design iterations in Figma is not only effective but also efficient as it eliminates the need to export designs to another tool. Everything stays within Figma, allowing you to add comments and insights directly on the design itself. This streamlines the process and ensures that all relevant information is easily accessible to the entire team.
Additionally, Figma offers flexible sharing options that enhance accessibility for team members without a Figma account. By setting the appropriate permissions, you can allow anyone with the link to view the file, ensuring that stakeholders and collaborators can access the designs without needing to create an account. For example, when a User Researcher recently joined the team, they were able to access and review all design iterations without needing a Figma account, understanding how research insights influenced design decisions.
Lucid
In Lucid, I developed a template specifically designed to document the iterative design process for each page of the service across multiple rounds of testing.
Here’s the structure I followed:
-
Document assumptions: Start by listing all the assumptions you want to validate through research.
-
Add page screenshots: Include a screenshot of the page you designed for reference.
-
Record research insights: Document what you learned from the first round of user research (UR), highlighting specific pain points uncovered, if any.
-
Note design changes: Specify what you changed or did not change based on the research findings.
-
Explain decisions: Clearly state why you made or did not make those changes.
-
New assumptions: Finally, jot down any new assumptions you want to validate in the next round of research.

I adhered to this structure consistently throughout subsequent design versions, ensuring a clear and organised record of the design evolution.
This approach was especially useful because the service had multiple different journeys. By using Lucid, I could keep everything in one place—the same board contained screenshots, research insights, and changes made from one version to another across all pages. Centralising all this information made it easy to track progress and maintain a holistic view of the design process for each journey.
Contrary to Figma, where files can be shared with anyone via a link, Lucid boards typically require users to have an account to access the content.
Conclusion
Documenting design iterations has proven to be invaluable in my work, not just for keeping track of decisions but for enhancing team collaboration and preserving the context of our designs. While the tools I’ve used—like Figma and Lucid—have made this process more seamless, the key takeaway is that effective documentation should be tailored to your project’s needs. Give it a try. You might be surprised at how much clarity and efficiency it brings to your design process.
1 comment
Comment by Ady Horan posted on
You've inspired me to start adding reasons for design changes in my product's Lucid board. Thank you, Laura!